Unreal Engine Visual Effects
By Dan Gant
PITCH BLACK
Volumetric Shadows
PITCH BLACK lets you add darkness to your environments with precise controls. Place PITCH BLACK actors in pits, corners, caves, and holes to cover them in absolute shadow. No light is powerful enough to overcome it.
PITCH BLACK works with all types of lighting. It works at all graphics levels, unlike volumetric materials. It can darken unlit materials as well.
Getting started
Use the Epic Games Launcher to add the PITCH BLACK asset pack to your Unreal Engine project.
Try the Showcase level
The Showcase level demonstrates some of the effects you can achieve with PITCH BLACK.
To see it, open your project. Browse to Content/PitchBlack/Levels and open the Showcase level. Play this level in your editor.
The Dark level gives you a character with PITCH BLACK attached to the camera, silhouetting distant elements against the night sky.
Add PITCH BLACK to your environment
In your level editor, open your Content Drawer. Go to Content/PitchBlack/Blueprints and drag a BP_PitchBlack_Box onto your scene.

Create some meshes and drag them inside to see PITCH BLACK’s effect on surfaces:

Pan your camera inside to see PITCH BLACK’s effect on the camera:
Click on the colored sphere in the middle to select the PITCH BLACK actor.
Look at the Details panel to change its settings:
Settings
Basic Settings
Enabled?
Enables or disables PITCH BLACK’s visual effects.
Invert? (Light inside, dark outside)
- Disabled: PITCH BLACK darkens inside its extents
- Enabled: PITCH BLACK darkens outside its extents
Darken Surfaces?
Toggles the surface-darkening behavior.
Darken Camera?
Toggles the camera-darkening behavior.
Intensity
Controls how much PITCH BLACK darkens the affected area.
- 0: PITCH BLACK has no effect
- 1: PITCH BLACK fades to absolute darkness
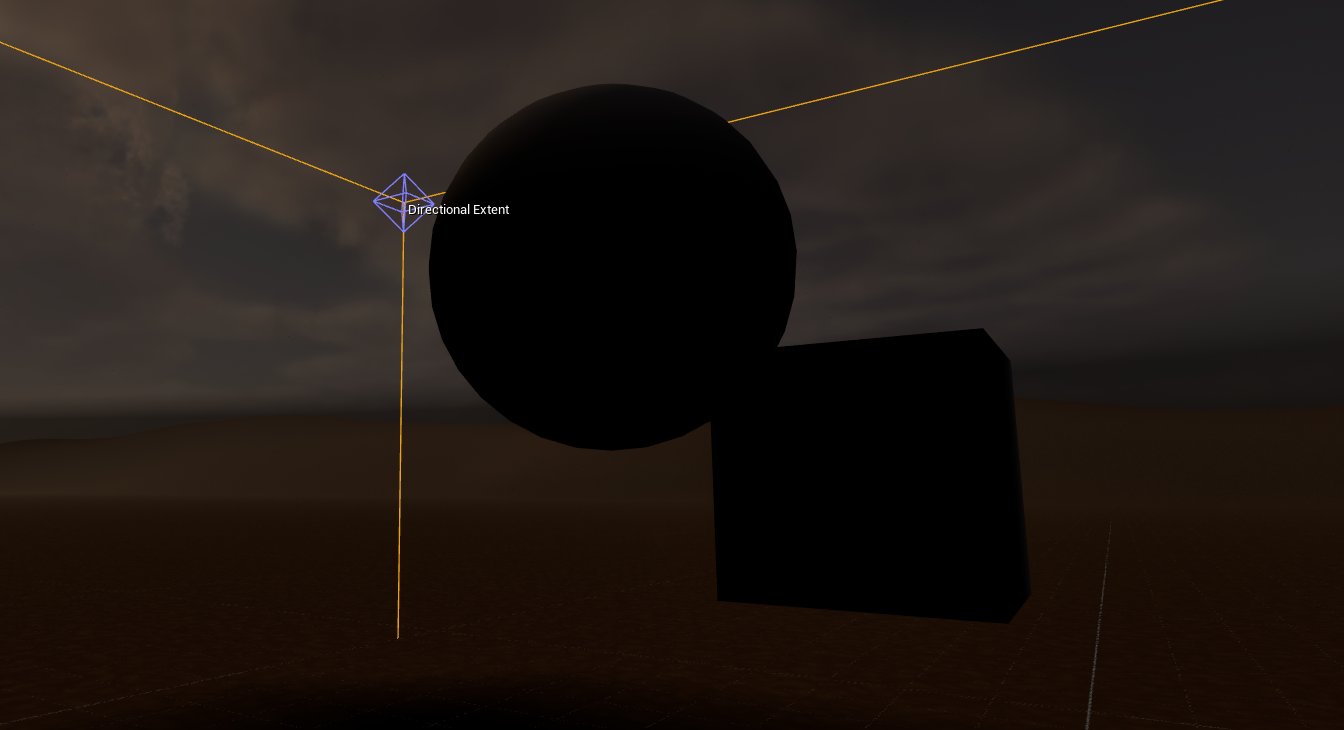
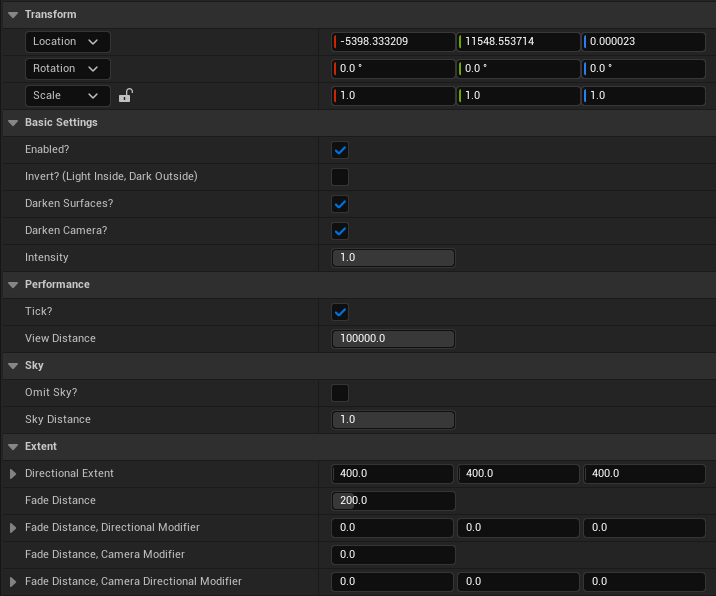
Extents
You can shape PITCH BLACK using Unreal’s actor transforms. Those transformations will applied on top of the following settings:
Total Extent
The maximum reach of PITCH BLACK’s effect outwards from its center.
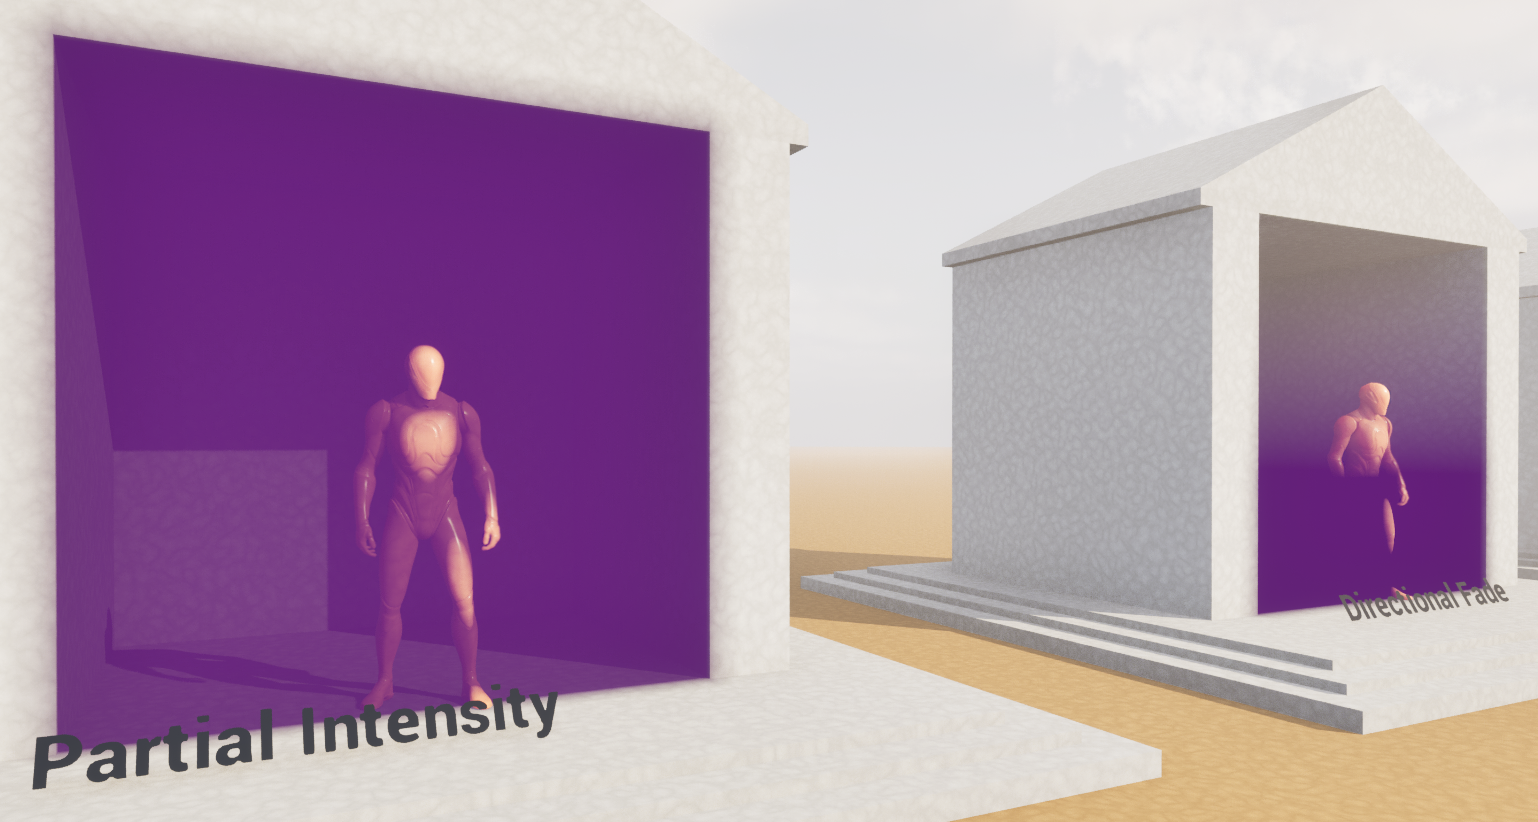
Fade Distance
A flat distance inwards from the edge over which the surface darkening fades from minimum to maximum intensity.
Fade Distance, Directional Modifier
A per-axis distance inwards from the edge over which the surface darkening fades from minimum to maximum intensity.
Fade Distance, Camera Modifier
A flat distance, added to the fade distance, over which the camera darkening fades from minimum to maximum intensity.
Fade Distance, Camera Directional Modifier
A flat distance, added to the fade distance, over which the camera darkening fades from minimum to maximum intensity.
Sky
By default, when using inverted mode, PITCH BLACK will darken the sky. You can disable sky darkening to achieve a silhouetted look. The “Dark” level demonstrates this.
Omit Sky?
Avoid darkening extremely distant surfaces.
Sky Distance
The distance beyond which to avoid darkening surfaces.
Performance
Tick?
By default, PITCH BLACK updates each frame to apply any changes you’ve made to its transform or settings. If you don’t plan to make any changes, set this to false to reduce CPU usage.
View Distance
Each instance of PITCH BLACK has its own post process volume. Each one within the view distance incurs some GPU usage. Reduce this distance to avoid rendering PITCH BLACK in places it’s not required.
Limitations
Translucency
Translucent materials behave unintuitively with PITCH BLACK. The Showcase level demonstrates this.
The two material properties which affect how they interact with PITCH BLACK are:
- “Output Depth and Velocity”
- Translucency Pass, either “Before DOF” or “After DOF”/”After Motion Blur”
Translucent materials with “Output Depth and Velocity” enabled will receive darkness if inside the mask. But they pick up undarkened light from undarkened faces of those materials will also transmit light from surfaces behind them that would otherwise be darkened.
- Before DOF: Receive full darkness. This is a good default setting.
- After DOF: Receive only partial darkness.
Translucent materials with “Output Depth and Velocity” disabled allow opaque surfaces behind them to receive correct darkness.
- Before DOF: Receive darkness based on the location of the next opaque surface
- After DOF: Receive no darkness.
Reflection
PITCH BLACK darkens surfaces after Unreal calculates reflections, so darkened surfaces will appear undarkened in reflections.
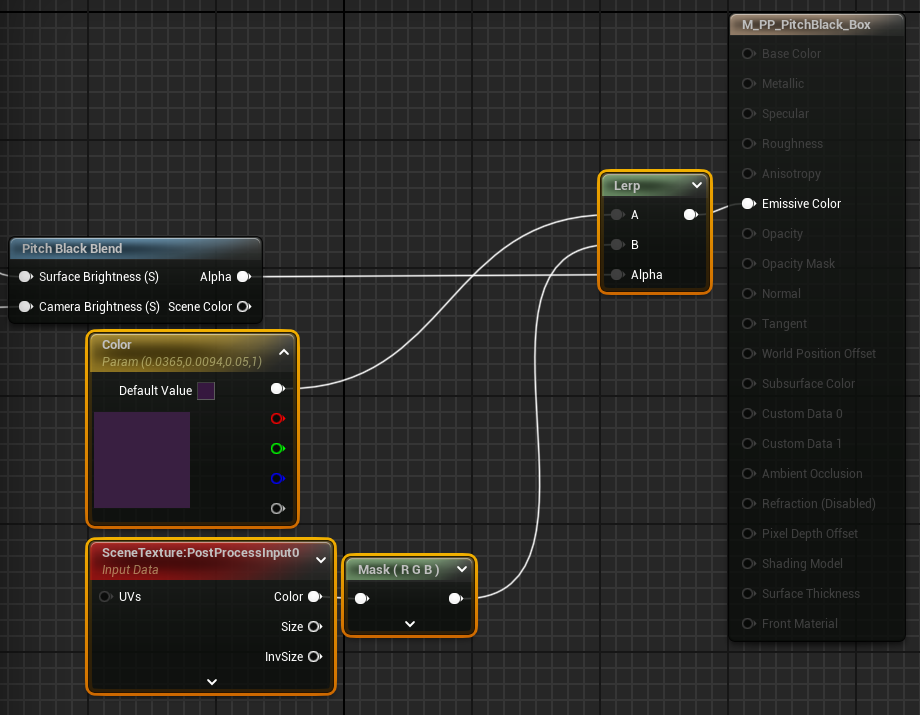
Extending PITCH BLACK
You can use PITCH BLACK as a base for building visual effects that use ellipsoid or box masks. PITCH BLACK’s material functions emit a 0-1 value which indicate how strongly the effect applies to the current screen pixel.
Using a different color
Open the material of your choice (M_PP_PitchBlack_Box or M_PP_PitchBlack_Ellipsoid). Add these highlighted nodes at the end:
CHROMIA
Exotic Stylized Color Grading
CHROMIA remaps your scene's colors to create unique styles. Design bold, opinionated looks that make your creations stand out.
Features
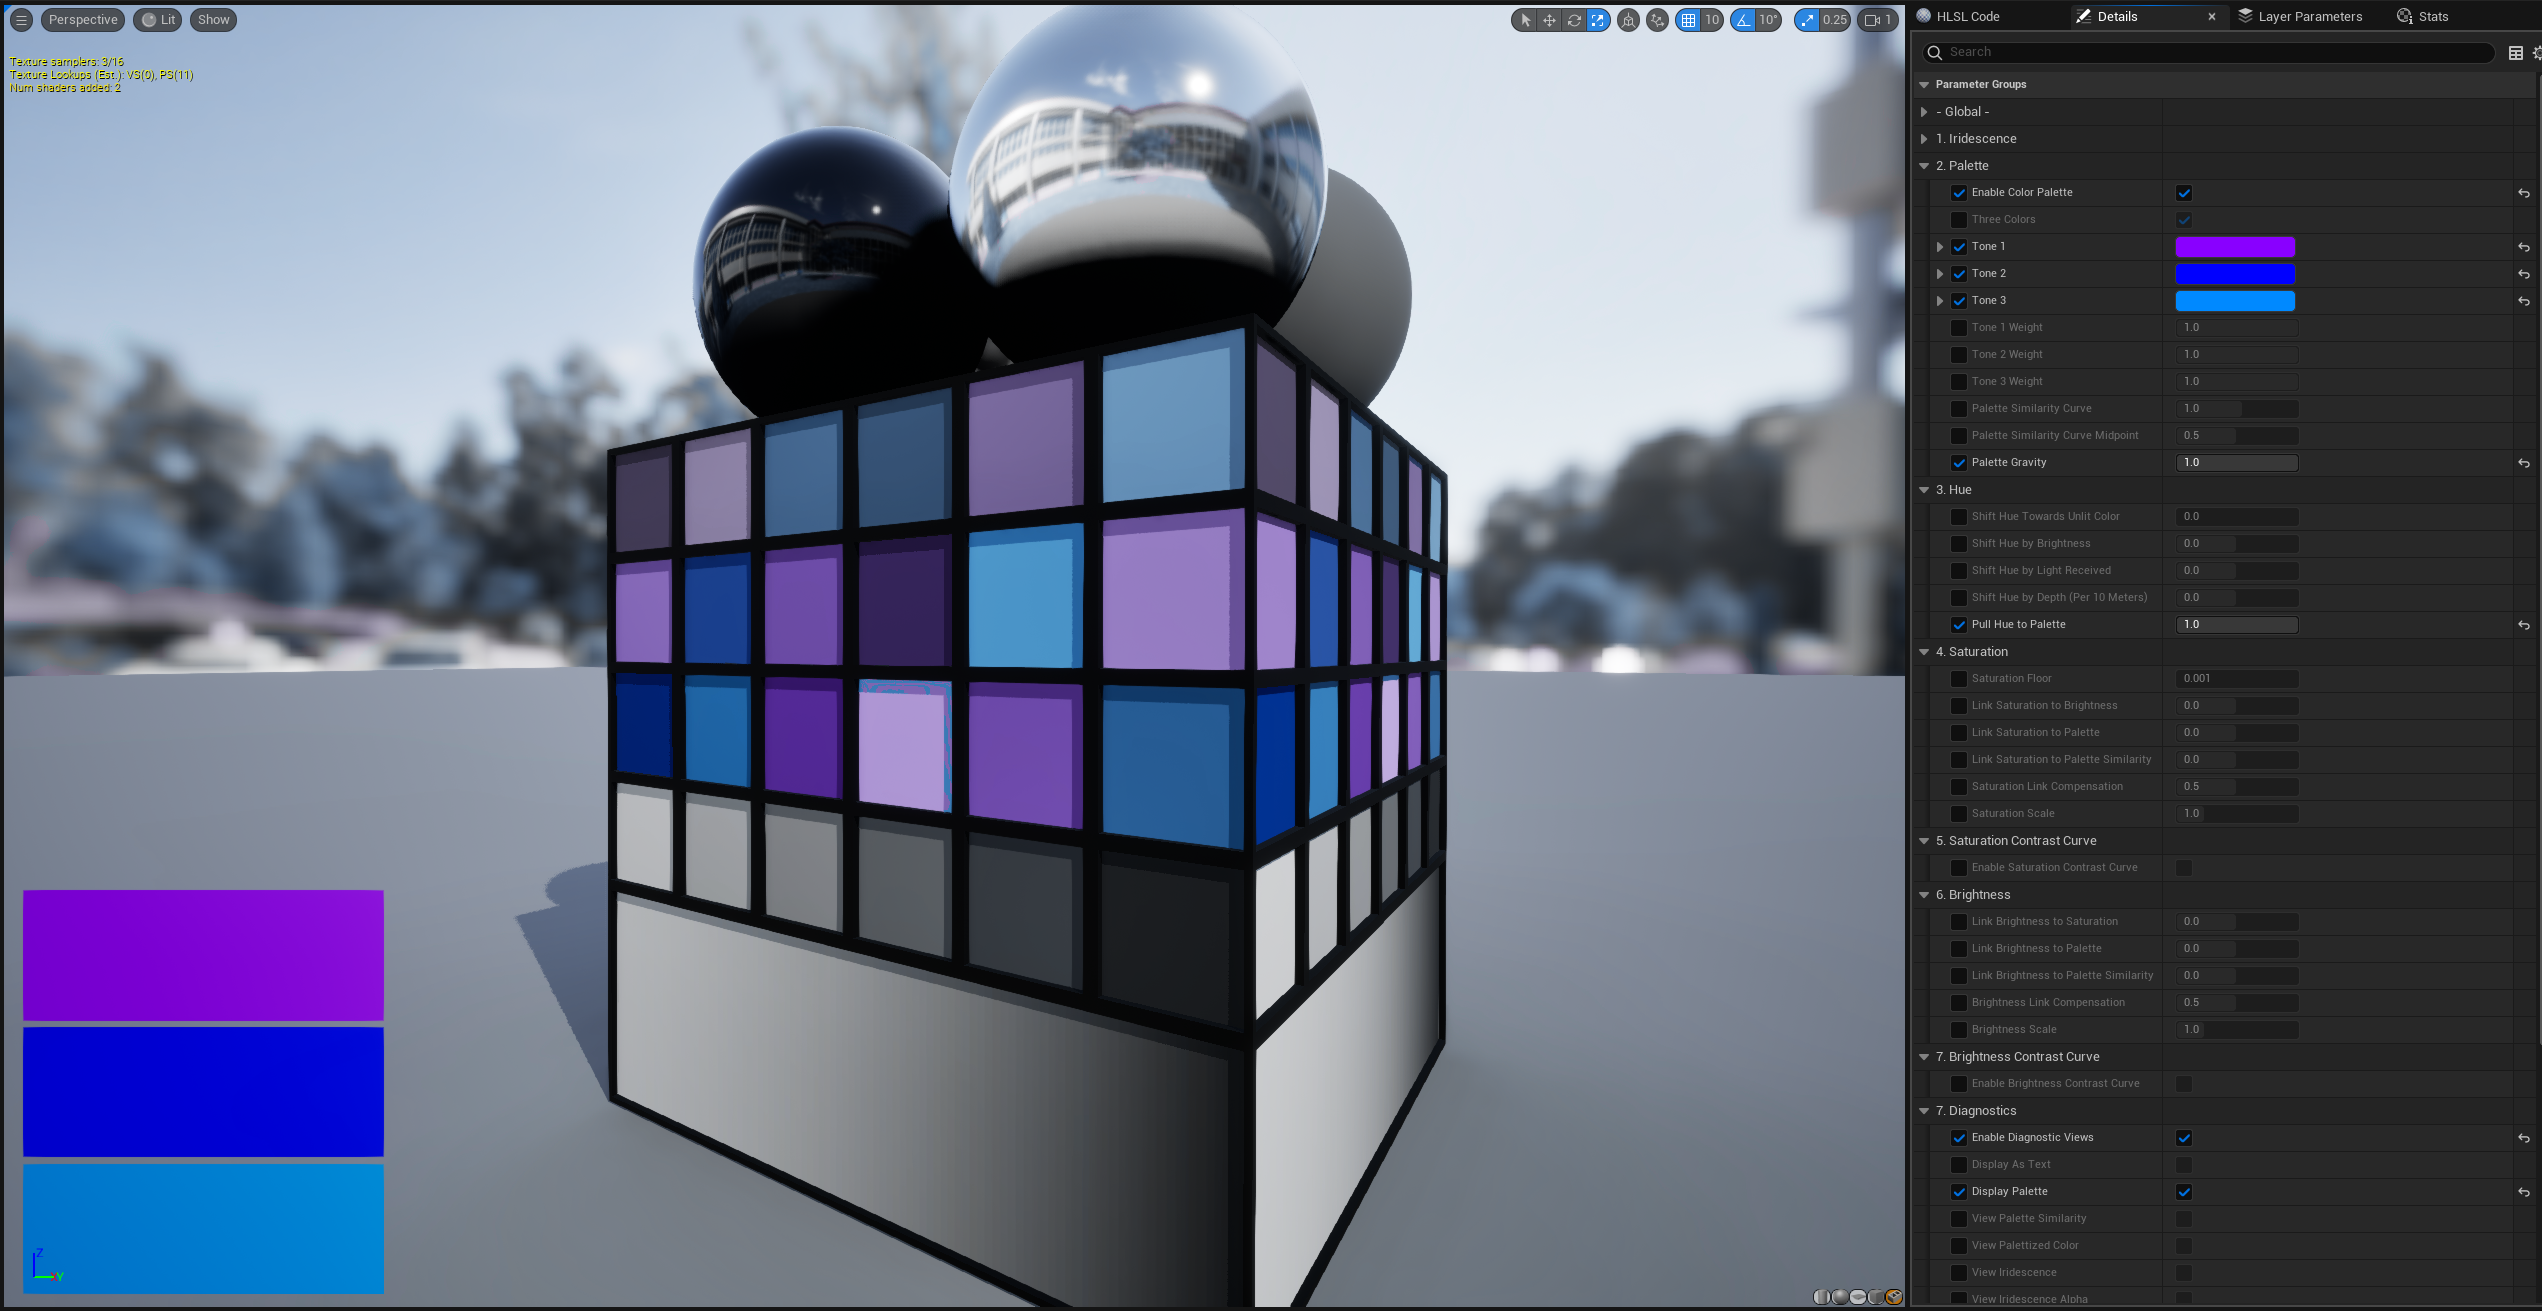
Tricolor Palettizer
Choose a tricolor visual identity and shape your image around it. Shift colors towards your palette, or emphasize colors that already match it.
Smart Color Curves
Make sweeping changes to your hue, saturation, and brightness, while preserving the maximum dynamic range of those values. CHROMIA uses the Oklab perceptual color space to create smooth color gradients you won't get elsewhere.
Exotic color correlations
Modulate your colors in ways you never thought possible. Give an iridescent glow to your shiniest surfaces, or make creeping polychrome shadows. CHROMIA's smart curves will make your craziest ideas look great.
HDR visual identity
Unreal only applies in LUTs Standard Dynamic Range, reducing your color depth. CHROMIA grades High Dynamic Range colors, preserving details for you.
Plays nicely with Unreal's color grading
You don't have to give up anything to use CHROMIA! You can still use Unreal's color grading tools if you want. CHROMIA applies its changes first, and you can fine-tune them in your post process settings.
Getting started
Use the Epic Games Launcher to add the CHROMIA asset pack to your Unreal Engine project.
Try the Showcase level
The Showcase level lets you try out CHROMIA's presets.
To see it, open your project. Browse to Content/ChromiaColorGrader/Showcase/ and open the Overview level. Play this level in your editor. Press HOME, END, or 0-9 to cycle through presets.
Add CHROMIA to your level
CHROMIA is a post process material. Here's how to add CHROMIA (or any other post process material) to your level:
Open your level. Create a Post Process Volume actor. Enable "Infinite Extent (Unbound)". Under "Rendering Features" look for "Post Process Materials". Click "(+) Add Element". Click on "Choose" and select "Asset Reference". This creates a slot labeled "Choose" where you'll drag a CHROMIA preset in the next step.
In your Content Browser, open Content/ChromiaColorGrader/Presets. Drag one of the Material Instances into your Post Process Volume's list of post process materials. You should now see the CHROMIA preset transforming the appearance of your level.
Customize CHROMIA
To start designing your own CHROMIA look, create a new Material Instance in Unreal's Content Browser. Open it, and set its Parent to Content/ChromiaColorGrader/M_CHROMIA. Drag your Material Instance into the Post Process Volume material array (like in the step above).
Your scene should look the same as it did before. CHROMIA's default settings leave your image unchanged. Now we can start creating a visual style.
Create a tricolor palette
In your Material Instance, look for "Enable Color Palette". Click the checkbox on the left to allow your instance to override this setting. Then click the checkbox on the right to enable the color palette.
Enabling the color palette introduces settings for your tricolor palette. Mouse over them to read what they do.
Let's play with the default palette, defined by Tone 1, 2, and 3. Override the "Pull Hue to Palette" setting in the "3. Hue" category. Slide it towards 1.0. Watch the colors in your scene gradually adopt the palette colors.
You can define your own palette by modifying Tone 1, 2, and 3. If you want to use fewer colors, you can disable "Three Colors" to go to a two- or one-color palette. You can adjust the weights of each tone, which let you emphasize one over another.
Some other settings that use the palette include:
- "Link Saturation to Palette" which lets you adjust match the saturation of tones in your palette.
- "Link Saturation to Palette Similarity" which lets you selectively desaturate colors outside your palette.
- "Link Brightness to Palette" and "Link Brightness to Palette Similarity" do the same for brightness.
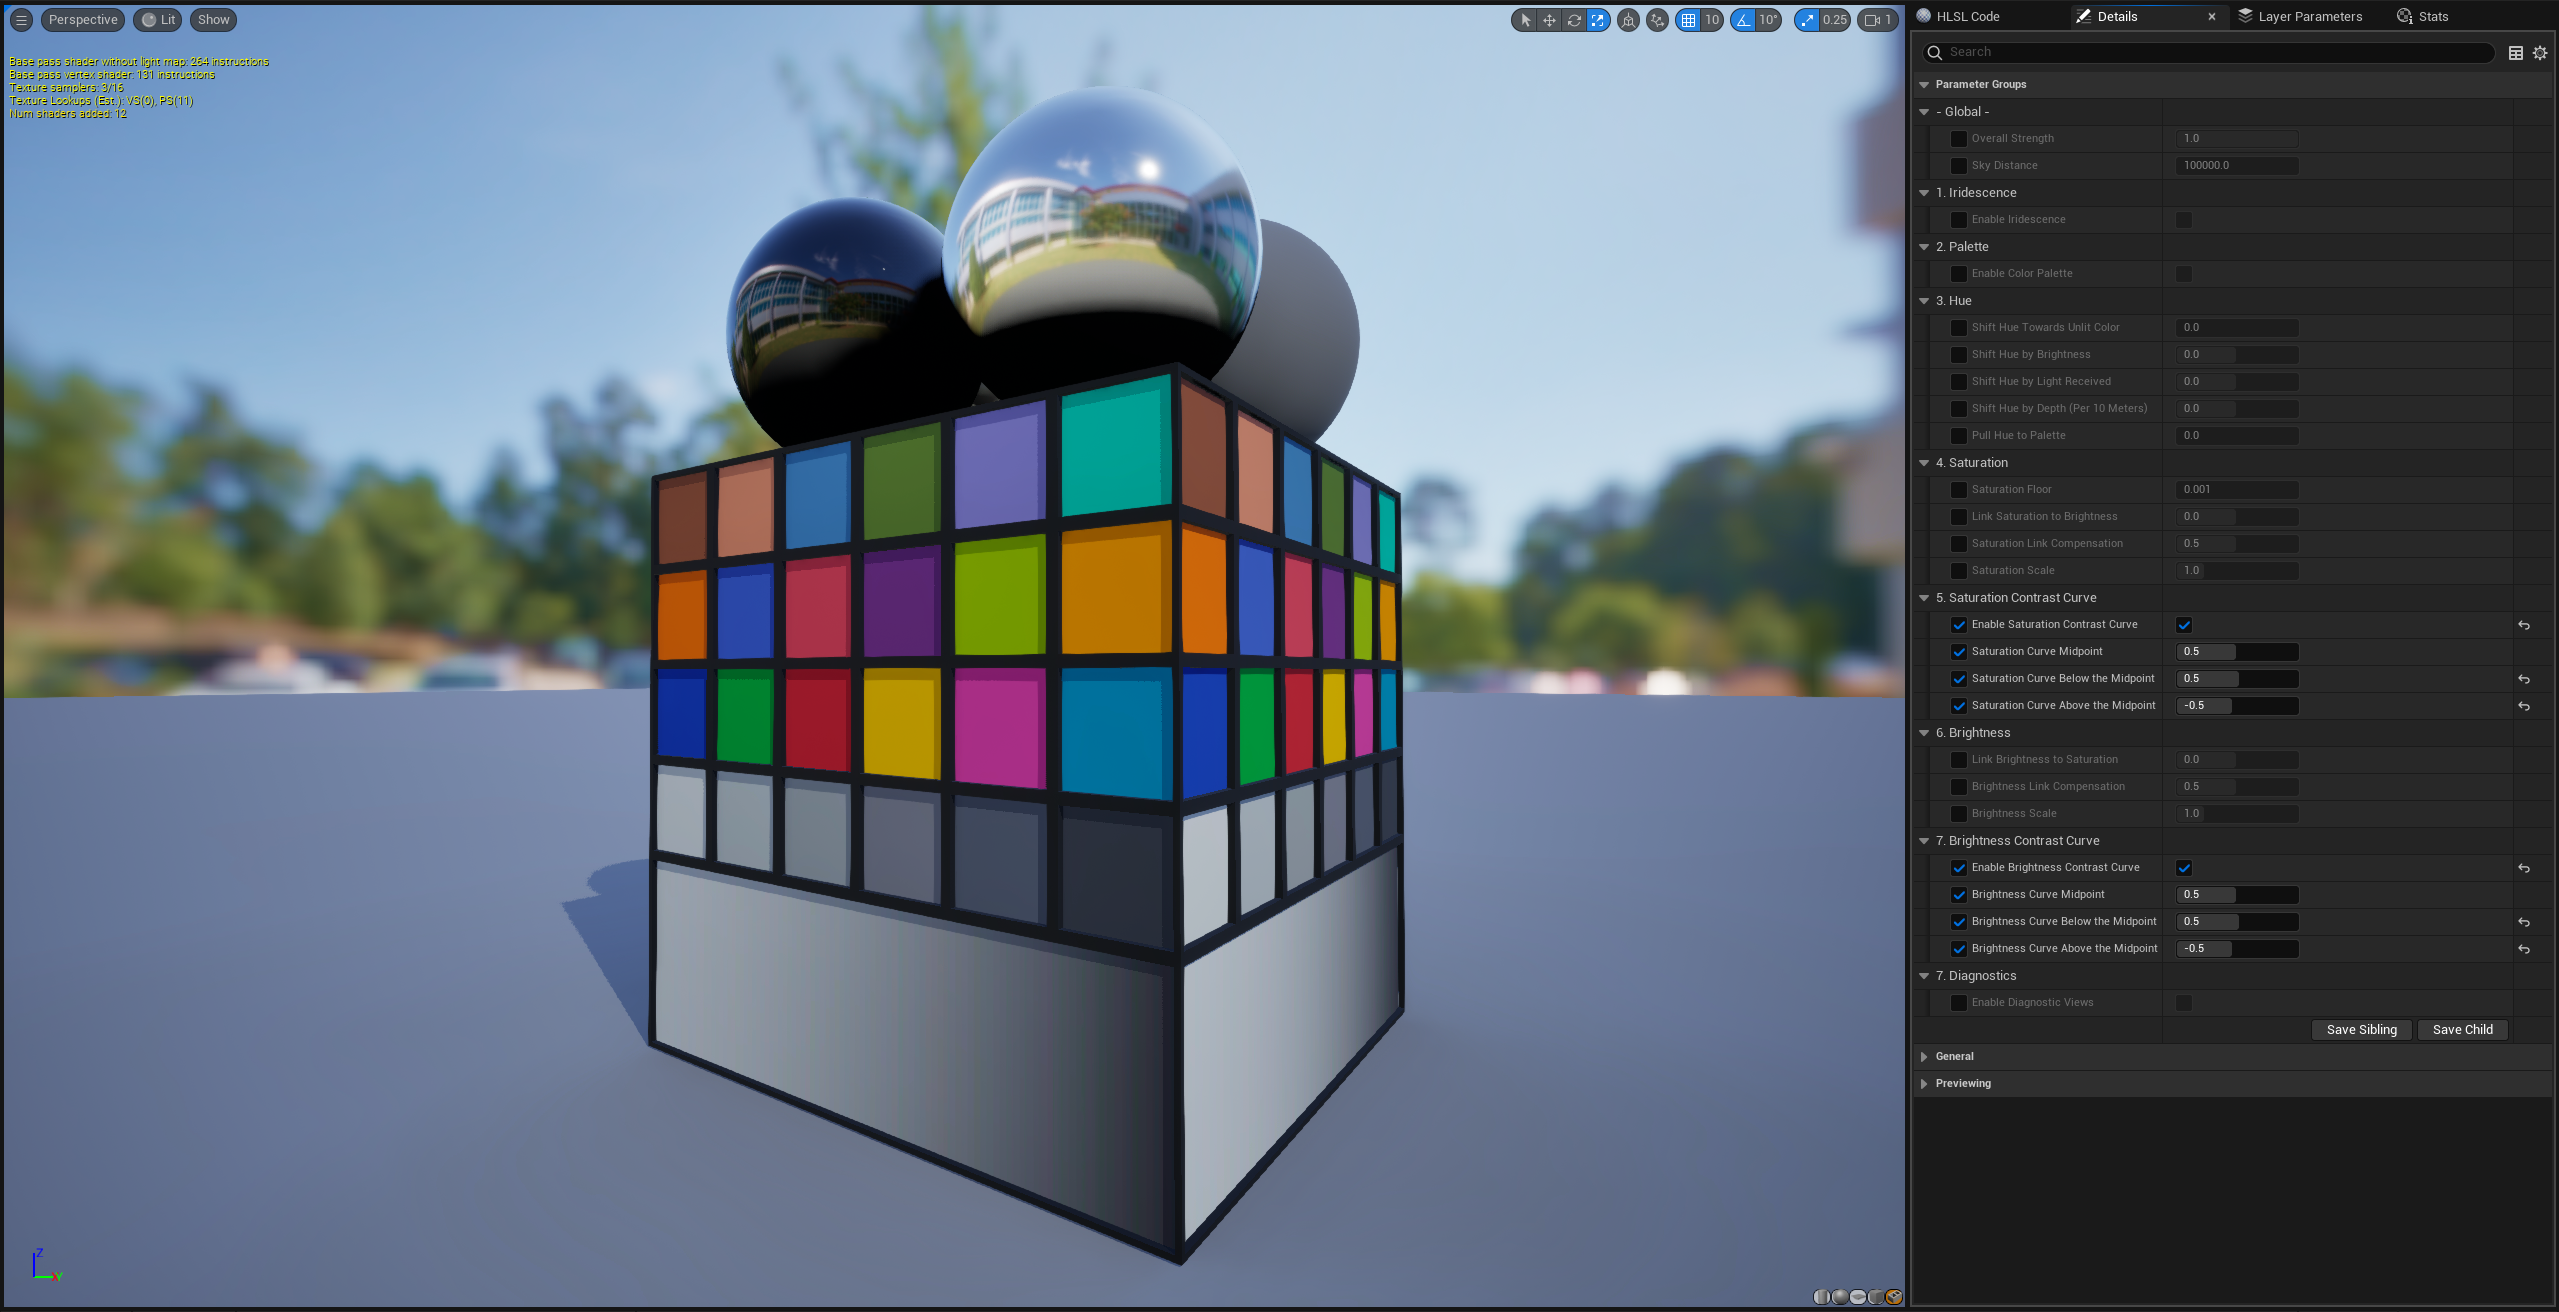
Apply curves to saturation or brightness
Override and enable "Enable Saturation Contrast Curve". This introduces some new settings.
Set "Saturation Curve Below the Midpoint" to 1.0. This will boost saturation of your less-saturated colors, while preserving a large dynamic range of saturation. Negative values pull saturation towards zero.
Try adjusting the "Saturation Curve Midpoint" to higher and lower values. This is the saturation level you lifted your colors towards in the previous step. At 1.0, your saturation values will be increased everywhere.
Experiment with "Saturation Curve Above the Midpoint". Negative values will pull saturation values back towards your midpoint. Positive values will exaggerate the saturation of your already-saturated colors.
Lastly, enable "Enable Brightness Contrast Curve" and experiment with the brightness curve. You can use these to adjust contrast dramatically, while preserving the relative brightness of pixels.
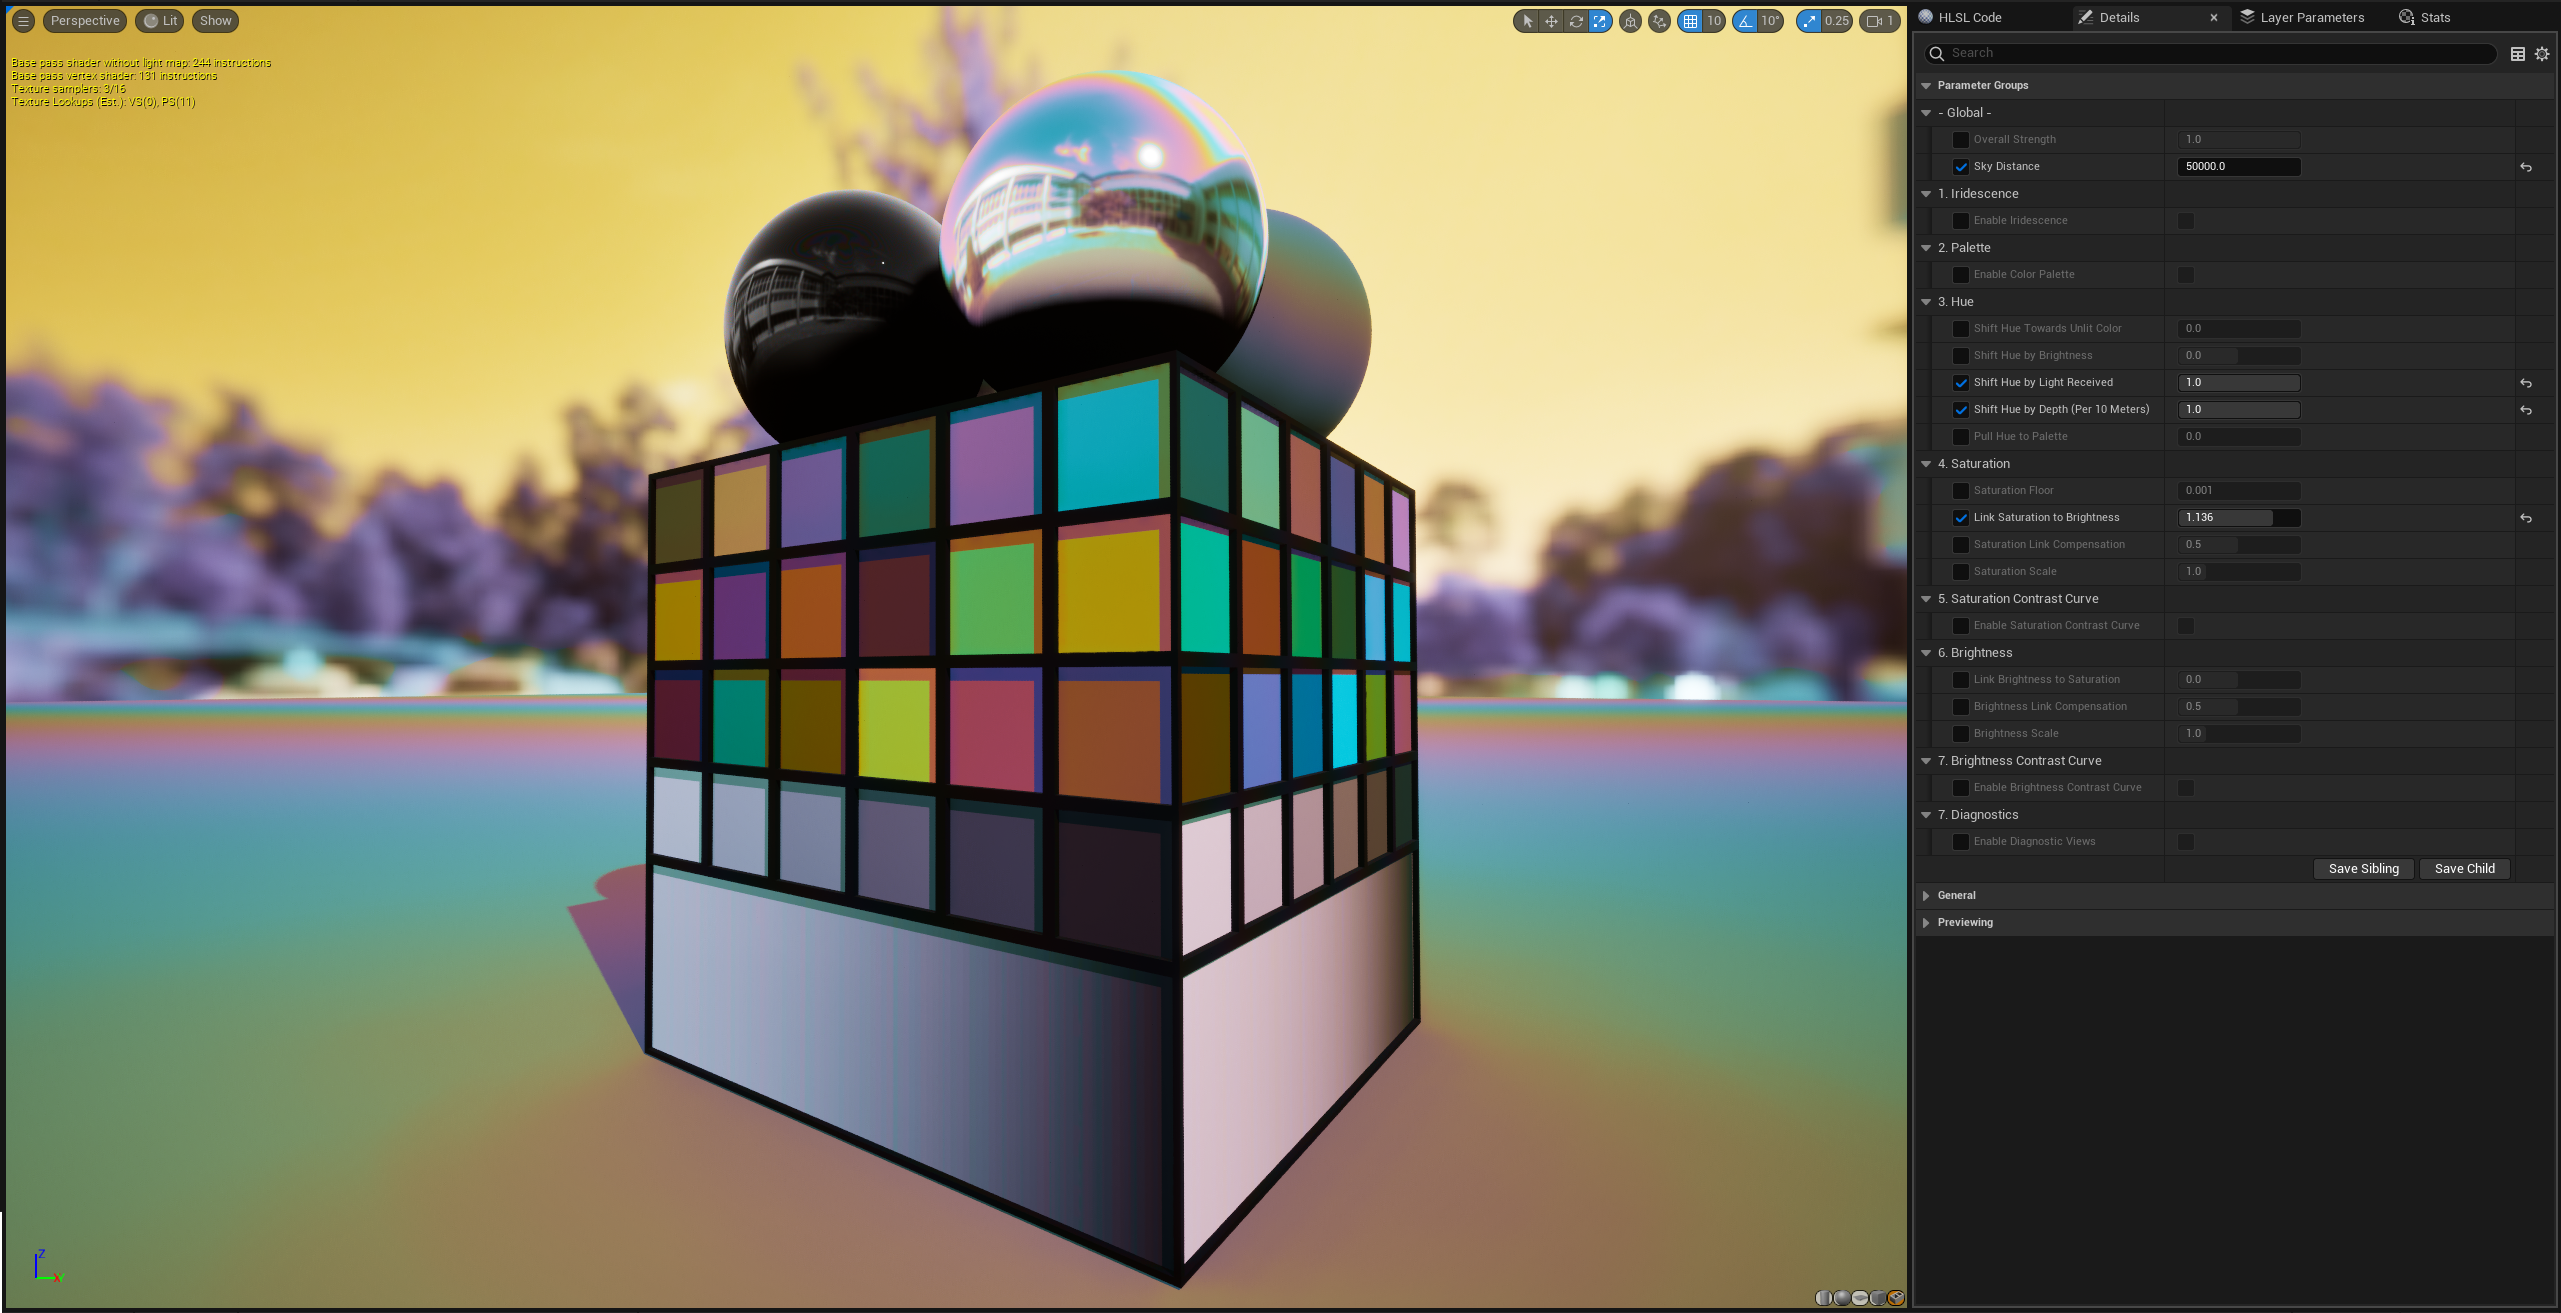
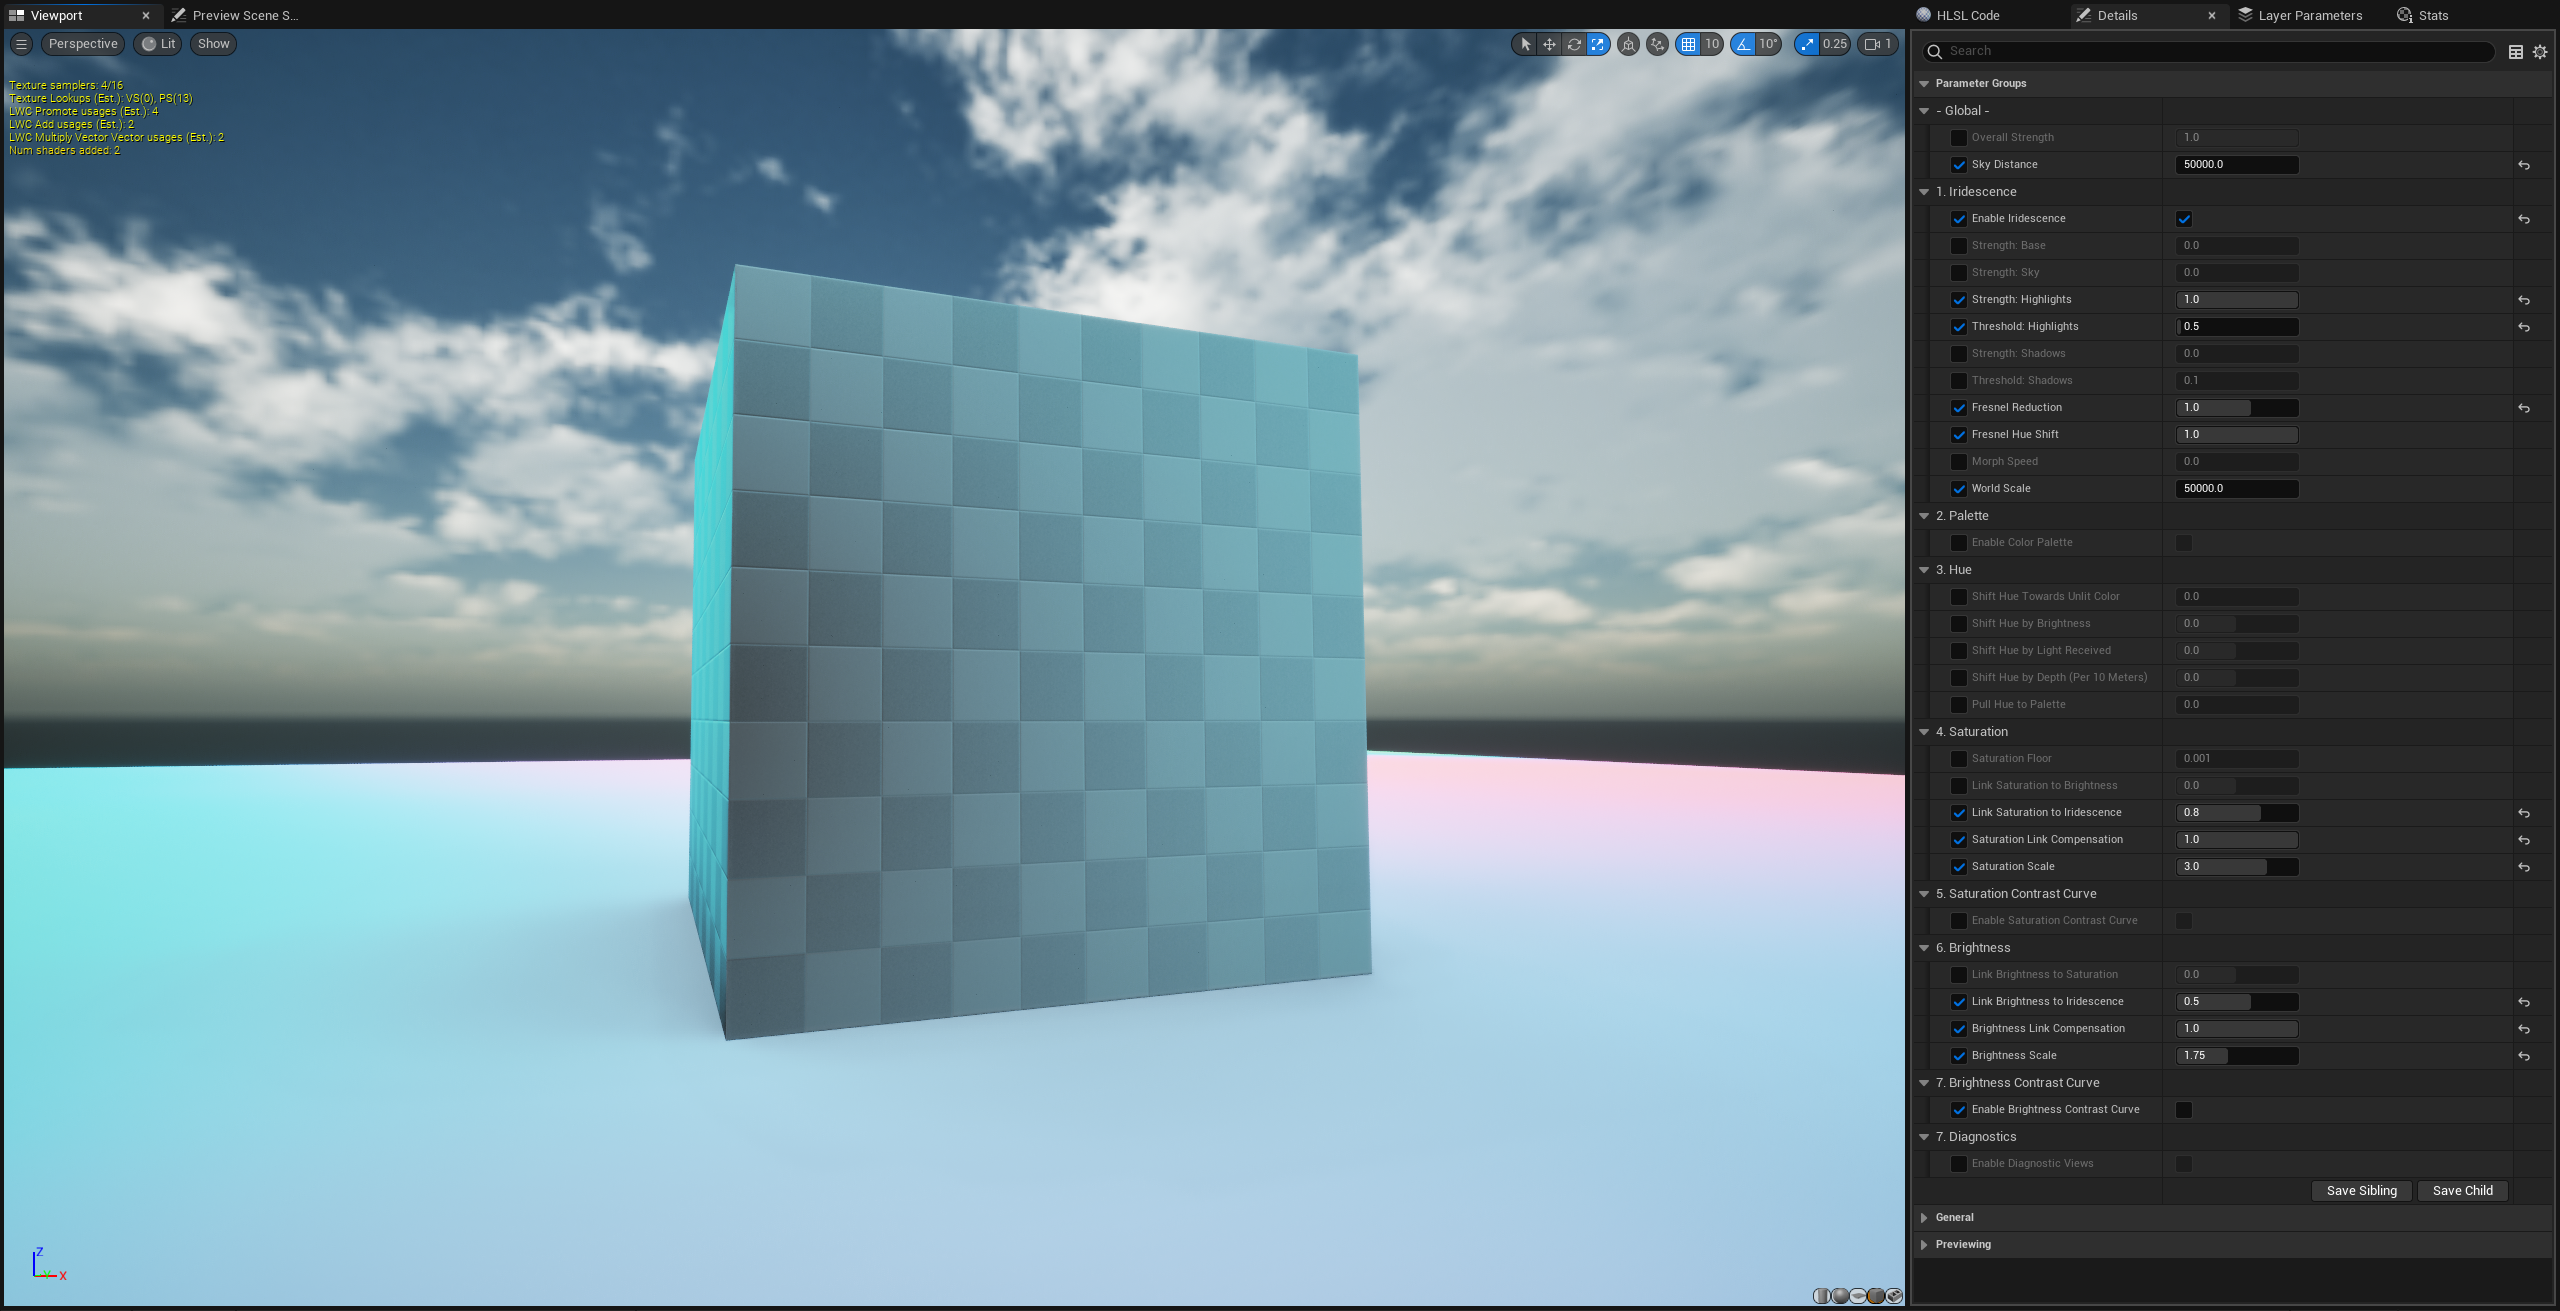
Add Iridescence
Override and enable "Enable Iridescence" and see the new options it introduces.
Set "Strength: Highlights" to 1.0. This will apply an iridescent sheen to your brightest pixels. If your scene is dark, you may not see much effect. Reduce "Threshold: Highlights" to extend the brightness range of the iridescent effect.
If you have an outdoor scene, turn "Strength: Sky" up to 1.0. This will produce a rainbow gradient across the sky emanating from your primary directional light.
Adjust "Fresnel Reduction" between negative and positive values to see the iridescence apply most strongly to surfaces angled towards, or away, from the camera.
Lastly, boost "Link Brightness to Iridescence" to 1.0" and "Brightness Scale" to 2.0 to watch your iridescent surfaces shine extra-bright.
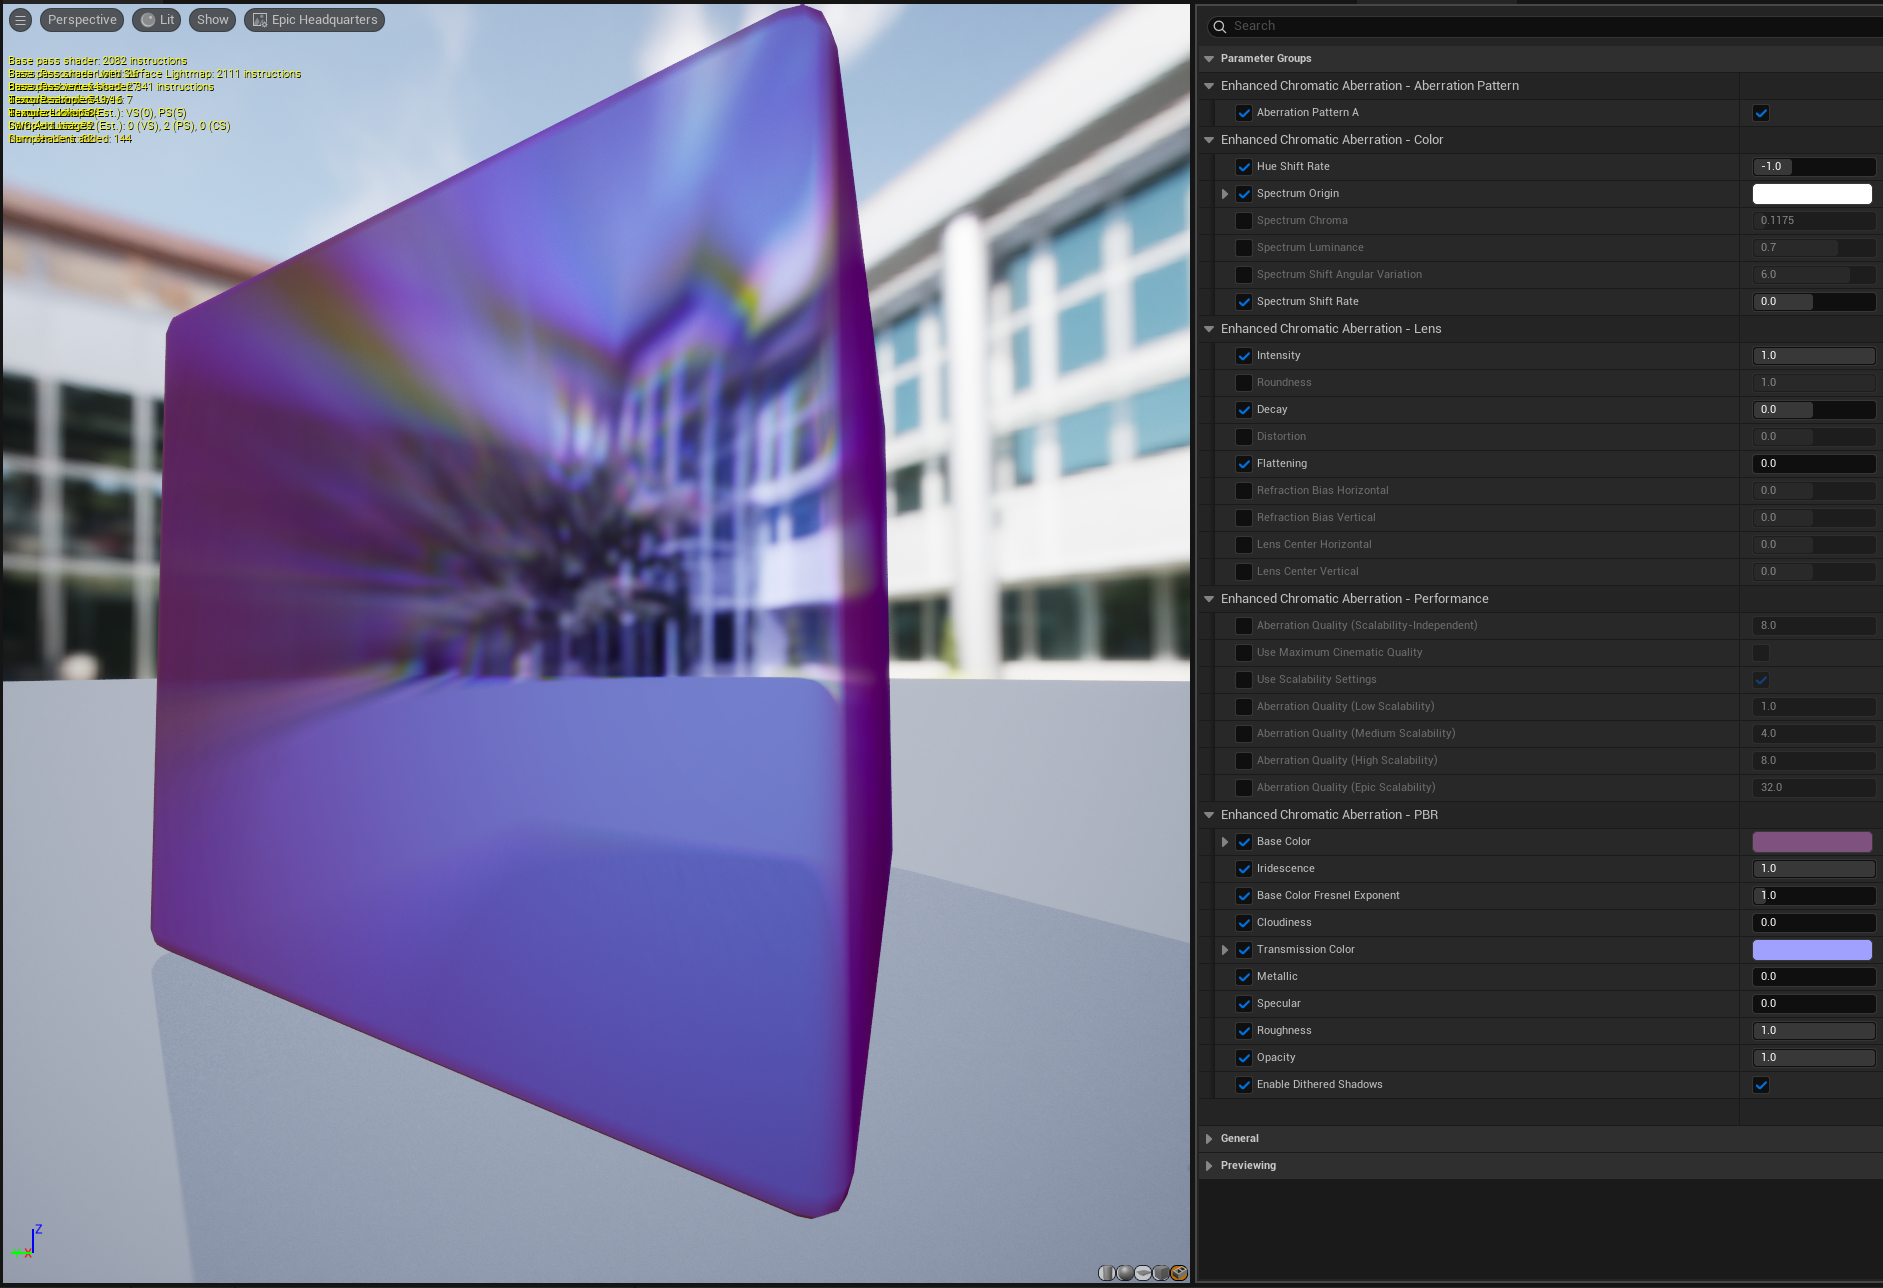
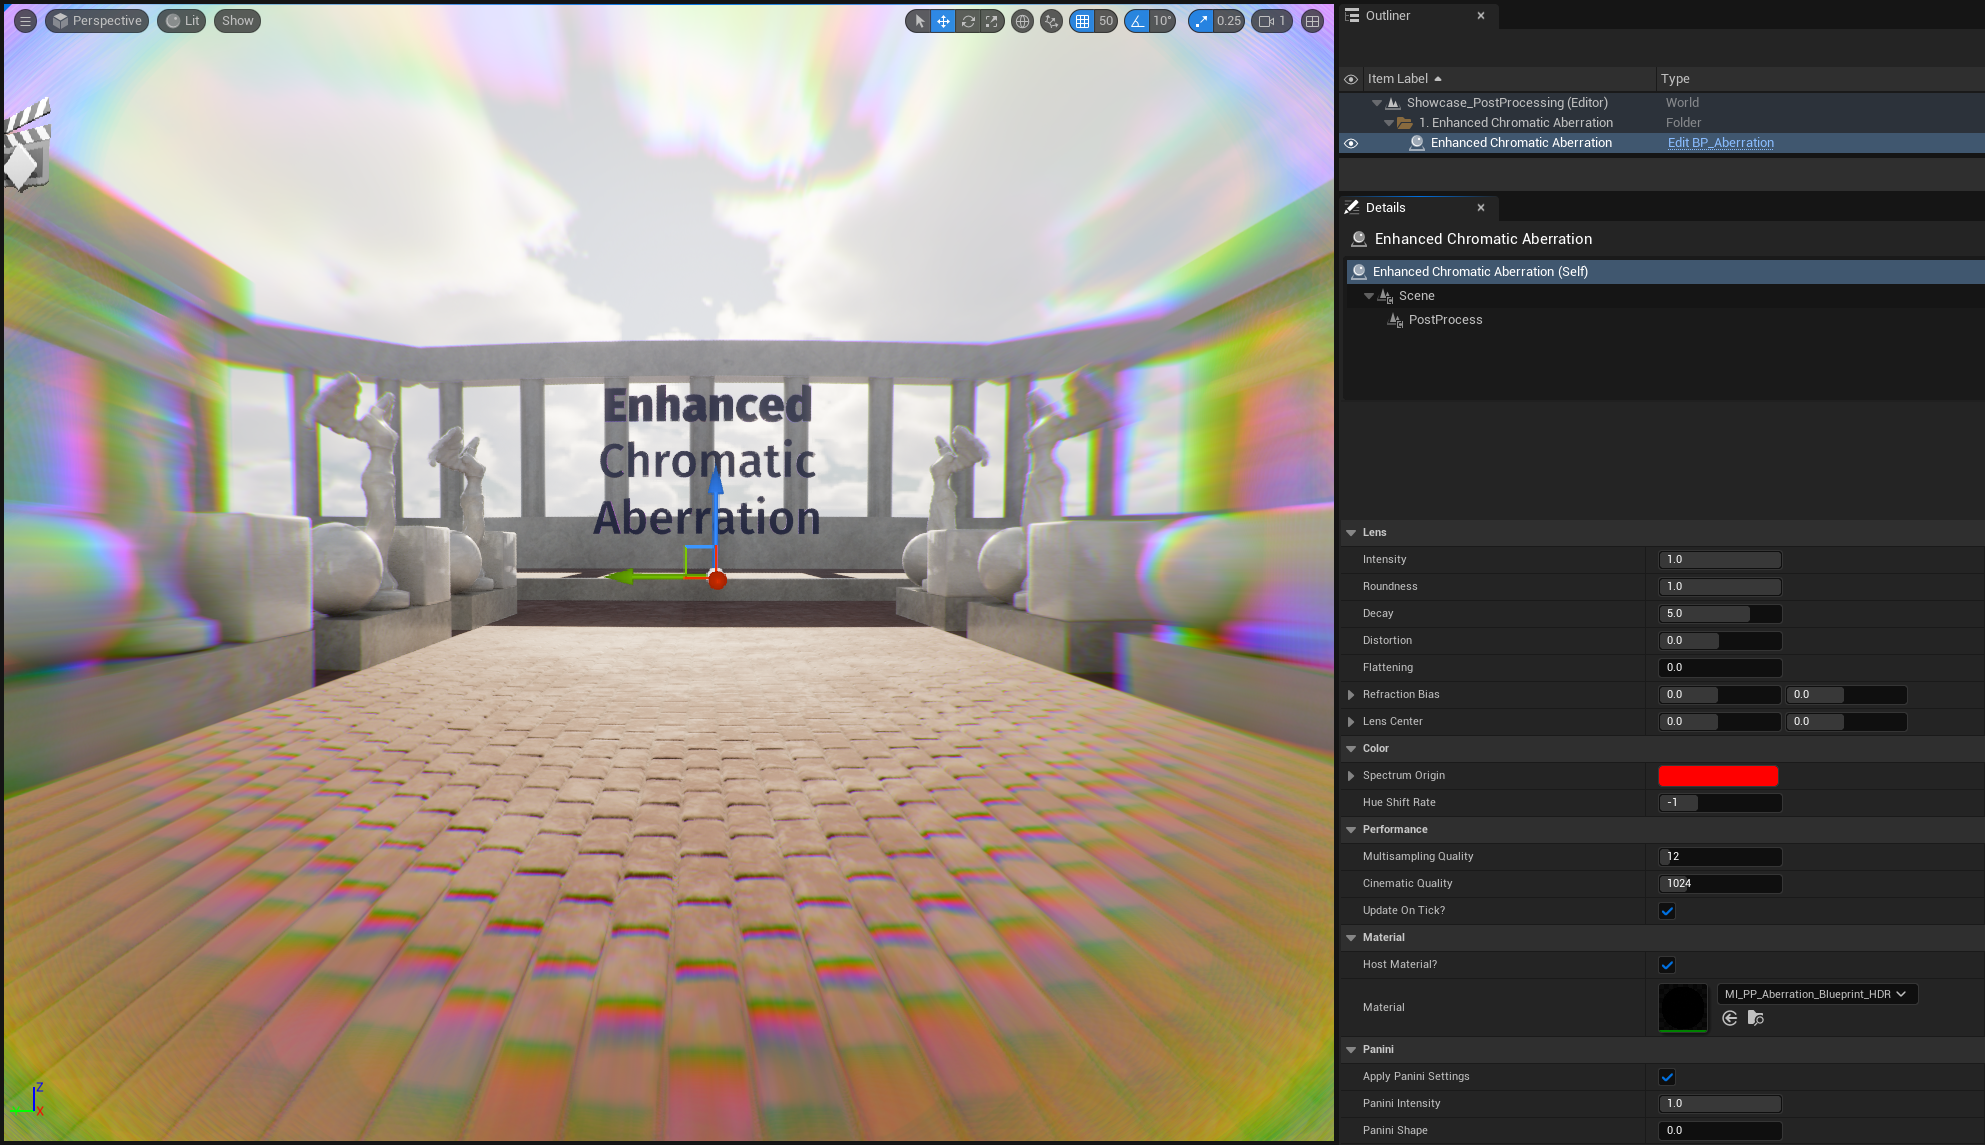
ENHANCED CHROMATIC ABERRATION
High quality multisampled lens simulation
ENHANCED CHROMATIC ABERRATION simulates the colorful refraction of a camera lens. Drop it your scene to instantly replace Unreal's simple three-color aberration with a juicy rainbow spectrum and powerful lens effects.
Create subtle edge enhancement or extreme mind-bending special effects. Control it via blueprint sliders, material instances, or keyframing. Or enhance your own materials with easy-to-use material functions.
Add ENHANCED CHROMATIC ABERRATION to your level
Here are two easy ways to use ENHANCED CHROMATIC ABERRATION:Blueprint
Drag BP_EnhancedChromaticAberration into your level. You'll see aberration immediately!
Control its appearance by dragging its sliders in the Details panel.
Material Instance
Create a Material Instance. Open it and set its parent to M_PP_Aberration_Standalone.
Create a Post Process Volume actor. Enable "Infinite Extent (Unbound)". Under "Post Process Materials" add an array element, select "Asset Reference", then drag in your Material Instance. You should see aberration in the viewport.
You can now control the aberration by editing the sliders on your Material Instance.
Included Materials
ENHANCED CHROMATIC ABERRATION ships with two base materials:
- M_PP_Aberration_Blueprint: For use by BP_EnhancedChromaticAberration. Gets settings from MPC_Aberration, which BP_EnhancedChromaticAberration modifies.
- M_PP_Aberration_Standalone: For adding to Post Process Volumes directly. Gets settings from material parameters that you can modify by creating a Material Instance.
ENHANCED CHROMATIC ABERRATION also ships with two Material Instances for each of these:
- MI_PP_Aberration_Blueprint_HDR
- MI_PP_Aberration_Blueprint_SDR
- MI_PP_Aberration_Standalone_HDR
- MI_PP_Aberration_Standalone_SDR
The HDR versions aberrate during the High Dynamic Range stage of post processing, before tonemapping. The SDR versions, likewise, aberrate in the Standard Dynamic Range stage after tonemapping. The HDR versions will cause the aberrated colors to undergo tonemapping. Whether you want HDR or SDR aberration is up to your taste and preference.
Settings Reference
These are the settings you can control on both BP_EnhancedChromaticAberration and standalone Material Instances:
Intensity
The overall amount of chromatic aberration to apply.
Roundness
Round aberration scales radially from the screen's center, emphasizing aberration in the corners.
Rectangular aberration scales horizontally/vertically from the screen's center, aberrating equidistantly from the screen edge.
Decay
Controls rate of intensity decay towards the center of the image.
- Negative: Slower decay.
- Positive: Faster decay.
Distortion
Distorts the lens shape.
- Negative values: Barrel/fisheye distortion.
- Positive values: Pincushion distortion.
Flattening
Cuts off aberration towards the center of the lens.
Refraction Bias
Directly aberrates the image in a fixed direction.
Lens Center
Moves the center of the lens, from which aberration originates.
Spectrum Origin
Aberration starts with this color towards the center of the lens, and proceeds through the spectrum at the Hue Shift Rate.
Hue Shift Rate
Controls the direction and rate of color skew in aberration.
Values beyond -1 and 1 cause colors to be repeated.
Blueprint Settings
These settings are exclusive to BP_EnhancedChromaticAberration:
Multisampling Quality
Increases the quality of the aberration by taking more samples from the image.
One sample per pixel aberrated is sufficient for totally seamless aberration.
The slider only goes up to 100 to ensure reasonable editor framerates, but this can go up to 4096 for extreme high-quality 8k rendering.
Cinematic Quality
Overrides Multisampling Quality during movie rendering only.
If 0 or below, defaults to using the Multisampling Quality value.
Update on Tick?
Updates material parameters on each tick.
You will likely want to disable this for games and other real-time applications to spare a bit of performance.
Host Material?
If enabled, spawns an unbound Post Process Volume with the Aberration Material on it.
Disable this if you want to manage the material yourself.
Material
Which Aberration material to host, if Host Material is enabled. This should be a blueprint-controlled material, which reads parameters from MPC_Aberration, like one of these:
- MI_PP_Aberration_Blueprint_HDR
- MI_PP_Aberration_Blueprint_SDR
Apply Panini Settings
Applies Unreal's Panini projection, allowing you to achieve crisp barrel/pincushion distortion without undersampling artifacts. This is a largely better way of acheiving lens distortion than the Distortion settings above. See Unreal's documentation for more information about Panini projection.
Panini Intensity
Sets the strength of the Panini effect via the "D" parameter. Using 0 disables Panini projection.
Panini Shape
Controls the shape of the Panini projection via the "S" parameter.
- 0: Pincushion projection
- 1: Barrel/fisheye projection
Standalone Material Settings
These settings are exclusive to Material Instances based on M_PP_Aberration_Standalone:
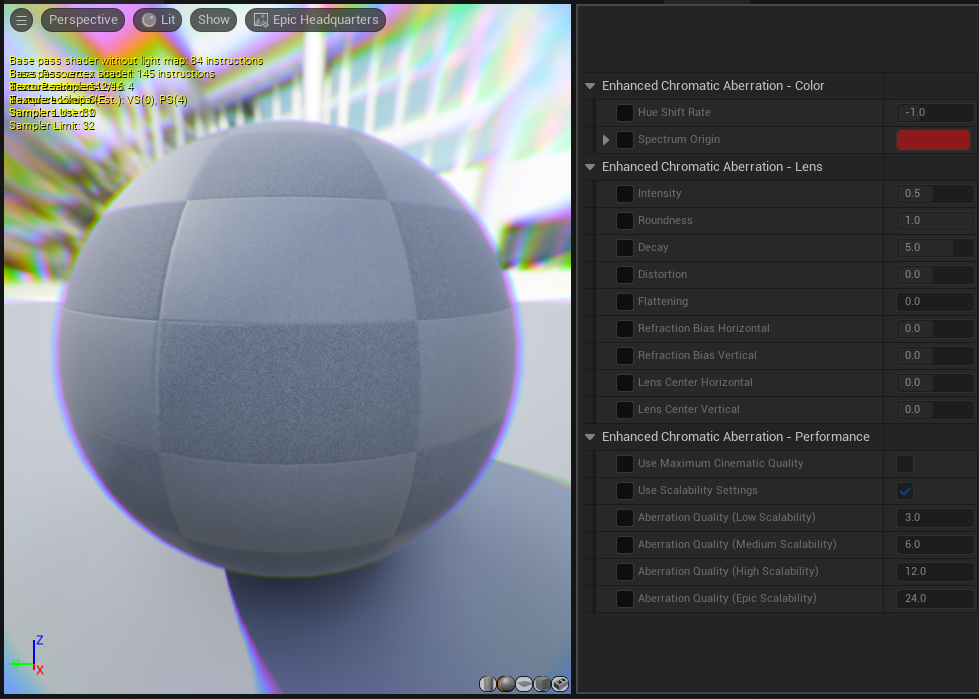
Use Maximum Cinematic Quality
Enables maximum quality, sampling aberration from every pixel individually. This will disable all other quality settings.
Use Scalability Settings
Picks a quality level based on the Shading scalability setting.
Aberration Quality (Per Scalability/Scalability-Independent)
Specifies the number of samples to take for the given scalability level. If "Use Scalability Settings" is disabled, defaults to "Aberration Quality (Scalability-Independent)"
Chromatic Aberrated Glass
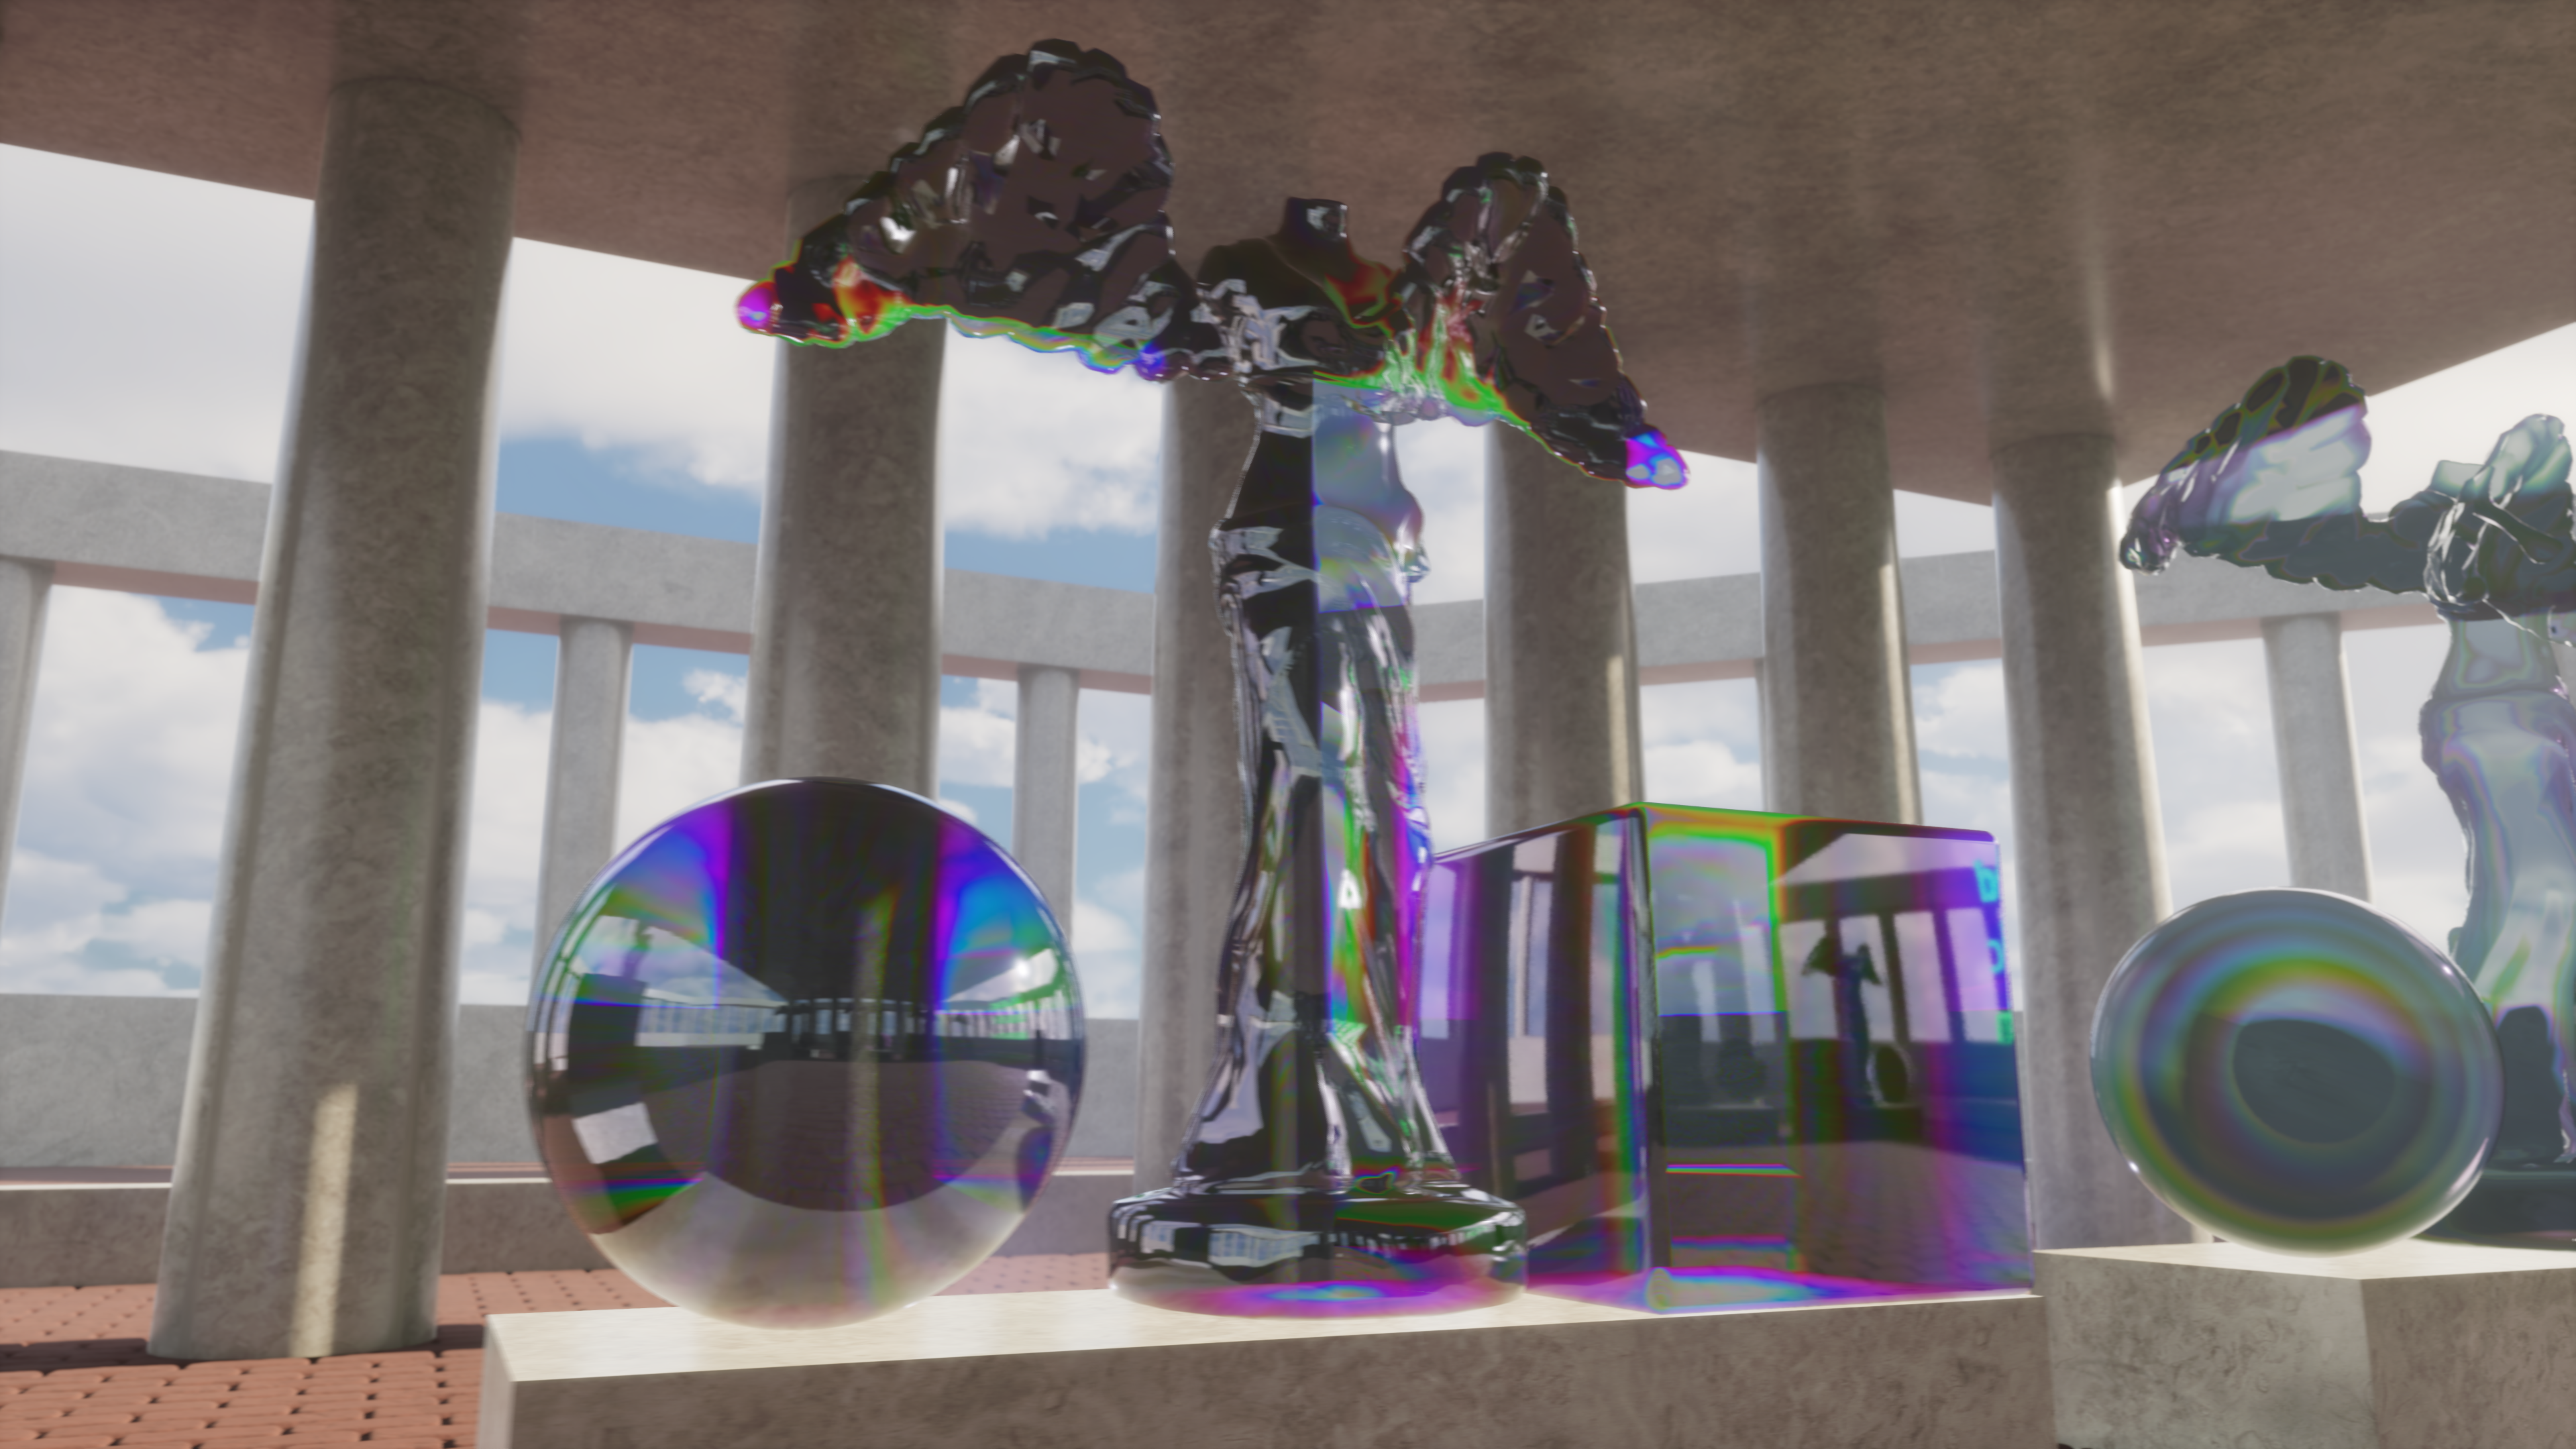
Enhanced Chromatic Aberration also ships with the Chromatic Aberrated Glass material, demonstrated in Showcase_Glass.
It shares the aforementioned parameters, plus some basic PBR and fresnel parameters.